You could
probably use Painter for this sort of thing and
end up with more realistic results, but it's nice to
figure out how to do new things in Photoshop.
(without filters :)
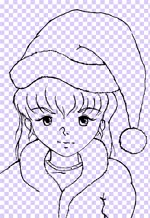
Scan
your image, clean up the outlines, and put them
on a layer.
Outline Girl Mask [Normal:100%]
Background
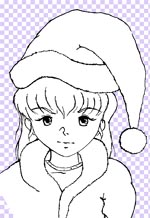
Make
a new layer between the Outline and the Background
Layers. This will be the mask used for the clipping
group. Just fill in the outline with white.
Outline
Color Layer [Color:100%]
Girl Mask
Background
Make
a new layer above the Mask Layer. This layer
will become the Color Layer that tints the
painting.
You need to create a clipping group at this
point. In Windows, hold down the ALT key
and click on the border between the Color Layer
and the Mask layer. The Color Layer
will indent in above the Mask Layer with
a dotted line between. All of the following new
layers should be grouped with the mask like this.
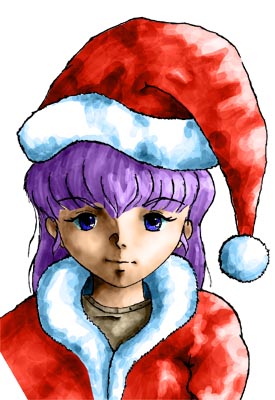
Pick some nice colors and paint in areas. Don't
shade! Flat color will work best. Because of the
clipping group, you can't paint out side
of the mask. Neat. Set the layer apply mode to Color at 100% opacity.
Outline
Color Layer Cloud Texture [Screen:50%]
Girl Mask
Background
Highlight
the Mask Layer and make a new layer (it will
be added to the clipping group automatically). With
the foreground and background colors as black and
white, run the Clouds filter [Filter >
Render > Clouds]. If you have PShop 5 (or Adlus
Gallery Effects Volume 1), run the Paint Daubs
filter [Filter > Artistic > Paint Daubs]. Set the layer apply mode to Screen at 50% opacity.
Outline
Color Layer
Cloud Texture Painting [Normal:100%]
Girl Mask
Background
Make
a new layer above the Mask Layer. This will
be the Painting Layer.
You finally get to paint now. Oh for joy! Use the
Paintbrush tool for harder edges or the Airbrush
tool for softer. Have wet edges checked
in the Options Palette and use low opacities
(10% to 50%). A shortcut to adjust opacity while
you're painting, use the number keys ... 1=10% and
0=100%. Use black as your foreground color and it
will look best if say build up to 50% rather than
just painting at 50%. Use white for the highlights.
I've found that white looks best at higher opacities.
Due to the Cloud
Layer above, you can't get nice dark shadows in
all areas. You need to make a Shadow Layer.
Make a new layer above the Clouds Layer.
Set the mode to Multiply at 100%. Paint with black
like you did on the Painting Layer.
Finishing Steps:
You can use the
magic wand tool in the Color Layer
to select parts of the image. Make adjustment
layers or adjust the color balance
and hue/saturation of specific parts to
add color variations into the mix (be sure these
are above the Color Layer!). Blur the Painting
and Shadow Layers to get a wet-on-wet
look.
Flatten all of the layers in the group to the
mask, but NEVER flatten them to the Outline
Layer until the piece is finished ... this
will keep your colors editable.